This program and it's documentation is Copyright © 2000 by Alexander Kröller.
mkmirror is distributed under the terms of the GNU General Public License, version 2.
That license allows you to do nearly everything you like to with the program - like redistributing or making changes, as long it is done for free. Read the license text for details.
This thing was made possible by the help of
 Skitch2 and
LaserBeams.
So, if you like the program
and want to use it,
just send a mail to the two and thank them for being brillant people. (And for
being willing to help others for free, which seems to be something many people
of the community aren't)
Skitch2 and
LaserBeams.
So, if you like the program
and want to use it,
just send a mail to the two and thank them for being brillant people. (And for
being willing to help others for free, which seems to be something many people
of the community aren't)
Credits for doing beta testing and investigating some details belong to dod1.
Feedback, bug reports and infos on additional details that are not mentioned here should be directed to ali.
The mkmirror part of the package contains:
| mkmirror.exe | - The program |
| mkmirror-doc.html | - What you're currently reading |
| toylite-mirror-example\ | - Example track (details are discussed later in this document) |
You need the library cygwin1.dll for the program, which is included in this package. Copy it into the system folder inside your windows directory.
The toylite-mirror-example directory contains an example track. Make a backup of your toylite track folder, create a new one and copy all files from the example folder to the new and empty toylite folder.
Play with the track (at best in time-trial mode). The track is presented as "Toy World 1" at the track selection screen.
Mirrors work as follows:
You have a (invisible) flat plane somewhere. All stuff on the front side of that plane gets duplicated and moved to the backside of the plane by the game engine.
To see the duplicated stuff, make the track invisible or transparent where you want the "visual mirror" to be.
For an example: Look at this scene:
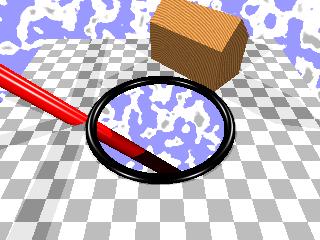
We want the round hole in the ground to be a mirror. The ground inside the ring is already made transparent (invisible in this case). We can look at the lower part of the sky map and the red spike below the ground.
Now, we insert a mirroring plane. As the plane only mirrors the stuff on it's front side, and nothing besides it, the plane has to be large. We make the plane as large as the whole ground, so that the whole wooden house is standing on the plane.
If we look at the scene now it looks like this:
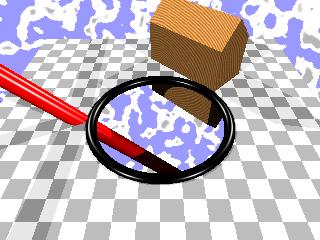
The house is duplicated and moved below ground, so it looks like it was mirrored, just as we wanted it.
But as mirrors are only doing this cheap trick, and do not block sight, we still see the sky map below (it's not a mirror of the above), and we also still see the red spike. That destroys the impression of looking at a mirror. So, to have nice looking mirrors, you have to make sure there is just nothing below the mirror.
Under some circumstances it even happens that parts of the red spike below the ground get mirrored and placed above ground - which is extremely annoying. So, be very careful when planning mirrors.

The provided program will create the .rim file based on a portals file (editing mode "Erm - nothing to see here") In that editing mode you can insert "Regions" and "Portals". The "Portals" are the thing we're interested in. They become the mirroring planes.
The most important keys for editing mode "Erm" are listed here. The keys Q, W, E, A, S, D, Insert, Delete and Return work as usual.
| key(s) | effect |
|---|---|
| Numpad-Dot | Toggle between "Region" and "Portal" |
| Spacebar | Select side to shrink/enlarge. (Notice that it's not visible which is the "current" side!) |
| Numpad-Slash, -Asterisk | Shrink/Enlarge current side. |
| Numpad-7, -8, -9, -4, -5, -6 | Rotate smoothly |
| Numpad-1, -2, -3 | Rotate by 90 degrees |
| Numpad-0 | Reset orientation |
| Numpad-Plus and -Minus | Toggle ID1 (useless for mirrors) |
| Shift-Numpad-Plus and -Minus | Toggle ID2 (useless for mirrors) |
So, it's similar to the "track zones" editing mode.
mkmirror only does the creation of the "mirroring planes". Creating transparent parts is up to you, and not discussed in this document.
Portals have two sides: A green and a red one. The green side becomes the mirrors "front side" (where the stuff is), the red one becomes the "back side" (where the duplicated stuff gets moved to)
The ID numbers you can assign for portals are completely useless. Don't bother with trying to do something with them - mkmirror discards them.
The example track has four mirroring planes. The portals file is still there, to give you the possibility to look at it. If you want to release a track that features mirrors, you should take the .por file out to avoid confusion.
Now, let's look at the four mirrors:
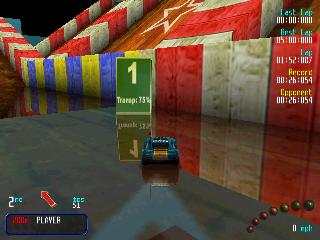
Mirror #1: Here, the track surface has a transparency value of 64 (=75%), which is nearly invisible. The mirror works as expected. There are two problems/issues:
Mirror #2: This mirror works strange, although it's properly set up. It seems like it isn't working - but take a look downwards: It mirrors as if it was horizontal! So either non-horizontal mirror are impossible, or I did something wrong.
Mirror #3: Works fine. This time, the "visual mirror" doesn't consist of truly transparent polygons but textures with the "black-is-transparent" effect.
Mirror #4: Works fine, too. Transparency is 192 (25%). The effect of reflection is nearly invisible, you have to look very hard to see it. But, in this situation, having more transparency would destroy the effect, because you could look right through it on the next lego piece.
By the way, the example track was made with rvglue5, using some track zones made for it. The command file used was:
create toylite

lego.w (
  tazsplit (
    toylite.taz
    0 ( transparency 64 )
    1 ( transparency 128 )
    2 ( transparency 192 )
  )
) |
Now, finally, on how to use mkmirror:
You have to create a portal file for your track. To stay at our example, it's "toylite.por". Look at the example track and section (4) for more details.
Then, create a .rim file for your track. Start a command line and type:
mkmirror toylite
Notice that the ".por" is not typed. mkmirror will read toylite.por and
create a toylite.rim from it.
Make sure you have mirroring enabled in the track's .inf file. There has to
be a line like
MIRRORS 1 0 0.3 1000
in it. Thanks to dod1 some things on the number's meaning are known (or at least
guessed):
If you encounter problems with weird looking mirrors, carefully re-read this document. If you understand how mirrors work, most problems and their solutions are pretty clear. The most confusing issue may be things under the mirror and mirror planes that are so small things besides the mirror don't get duplicated.
As it currently seems, only horizontal mirrors work. If you somehow get a non-horizontal mirror to work, let me (and all other's in the community) know.